Add or modify cost models
In cost accounting, a cost model is a self-contained set of data for costing that you can configure that can change over time. Hospitals add departments and accounts all the time. They may have to make changes about how to distribute costs and handle departments and accounts.
In 2020 and 2021, with COVID-19, both operational and environmental changes can impact how an organization will want to approach cost accounting. The flexibility of a cost model, being able to be as broad (all entities for 12 months), or narrow (one entity for one month), allows your organization to configure its cost models to meet immediate requirements.
To understand how cost models work, we recommend you review Working with cost models.
TIP: To view and compare different cost model configurations, you can open them by using separate browser tabs.
To add or modify a cost model
-
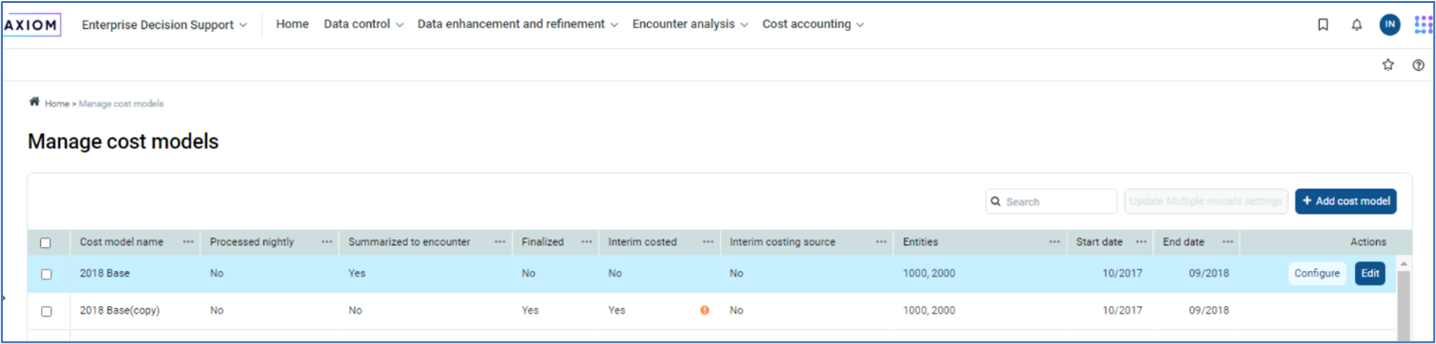
From the navigation bar on the Enterprise Decision Support home page, in the Cost accounting drop-down, select Manage cost models or Modify most recent cost model.
The Manage cost models screen is designed to:
-
Provide all your cost models in one place.
-
Let you make quick changes to multiple models simultaneously.
-
Get an overview of what is contained in the cost model.
If adding a cost model, from the Manage cost models screen, select Add cost model. The Create a cost model dialog box appears which mirrors the Modify a cost model dialog box in step 2.
If modifying a cost model, at the top of the cost model home page, select the model name from the Select cost model drop-down, and then select the gear icon
 .
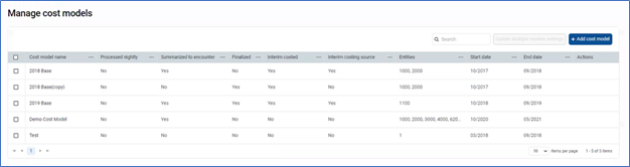
.The cost model management screen consists of the following columns:
Column name Description Cost model name Name you provide for the cost model
Processed nightly Process cost model on a nightly basis.
Summarized to encounter Do one of the following:
-
Designate this model as a production or "live" model by allowing Axiom to summarize the costing results at the encounter level.
-
Designate this as a what-if model by preventing Axiom from summarizing the costing results to the encounter level
Finalized A cost model not expected to have any further changes. Interim costed Interim cost source applied to current encounters for most accurate cost assessment.
Interim costing source Historical data point (your cost in the past to identify current cost)
Entities Objects in which to apply the cost model. Start date Select the start year and month for which to process.
End date Select the end year and month (within the same fiscal year) for which to process.
Actions>Edit or Configure Make changes to any cost model. Select Configure to open the Modify a cost model dialog box. Select Edit to open the last used cost model for the costing process with the option to select which model you'd like to edit. -
2. To modify a cost model, under Actions, select Configure at the far right of the Manage cost models screen.
3. In the Create a cost model or Modify a cost model dialog box, complete the following fields, and select Next:
| Field | Description |
|---|---|
| Use this as the final model |
Do one of the following:
|
| Summarized to encounter? |
Do one of the following:
NOTE: To prevent double costs, Axiom only allows one cost model per entity per period to be summarized to encounter. |
| Interim costing source? |
Do one of the following:
|
| Is interim costed? |
Do one of the following:
|
| Name* |
Enter a unique name for the cost model. TIP: We recommend using a name that indicates the period in which the costing process takes place. For example, Costing 2022 or Costing 2022 Q1. |
| Description | Enter a description for the cost model. |
| Start date* |
Select the start year and month for which to process. |
| End date |
Select the end year and month (within the same fiscal year) for which to process. NOTE: You cannot select a date that is more than 12 months outside of what you selected in the Start Date field. |
| Entity | Select the entities in which to apply the cost model. |
| Markdown percent* | Select the entities in which to apply the cost model. |
4. Complete the following fields, and select Save.
This main purpose of this dialog box is to identify the reference table versions you want the cost model to use for processing. If you want to create a new table version for any of the areas listed (departments, accounts, reclasses, and so on), you can name the new version here first, and as you go through the cost model setup process, you configure the new tables.
For example, let's say you want to create a new Departments dimension table to be used only for a new east coast region cost model. You might name the table "Departments - East Coast" in this dialog box. When you get to the Departments dimension area of the cost model setup process, the system will default to the new "Departments - East Coast" table you created. You can then add or remove departments, as needed, to support the cost model. If you are not yet sure if you are going to need a new table, you can always create a new table later during the cost model setup process.
| Field | Description |
|---|---|
| Department |
From the drop-down, do one of the following:
|
| Account |
From the drop-down, do one of the following:
|
| Cost category |
From the drop-down, do one of the following:
|
| Cost method exclusion |
From the drop-down, do one of the following:
|
| Direct to encounter |
From the drop-down, do one of the following:
|
| Micro |
From the drop-down, do one of the following:
|
| Use transaction microcost? |
Do one of the following:
|
| Markup |
From the drop-down, do one of the following:
|
| RVU |
From the drop-down, do one of the following:
|
| Use provider RVU? |
Do one of the following:
|
| Reclass |
From the drop-down, do one of the following:
|
| Allocations |
From the drop-down, do one of the following:
|
| Use simultaneous equations to allocate department costs? |
IMPORTANT: We recommend that you first review the following Understanding simultaneous equations section before setting this option. If you choose to implement this feature, and to ensure you understand the implications, consult with one of our Syntellis Implementation consultants, or Syntellis Support. Do one of the following:
|
-
Continue setting up the cost model by configuring the following areas:
-
Dimension versions, manual statistics, and adjustments
-
Methods
-
Processes
-
Understanding simultaneous equations
The simultaneous equation (SE) method of cost allocation provides a more accurate method of allocating department costs. When processing allocations, the system places the records and allocation rules into a matrix, and then system processes them together. If your organization decides to use SE, you need to define the costing allocation rules to take this into account. For this reason, we recommend that you do not switch back and forth between SE and single-step-down because it could result in inaccurate data.
